Car Seat Cover Installation Instructions
All our seat covers are "slip-on covers" designed to go directly over your seats, no need to remove existing upholstery of seat, no need to remove seats from vehicle, no special tools needed. Installation takes generally 20-30 minutes per front seat. Yes, you can install them yourself!
Installation Videos
See all our installation videos, resolving common issues videos, and final installation videos on our YouTube channel.
Front and middle row installation videos
Rear row / back seat installation videos
Downloadable installation instructions (printable PDF files)
Instructions are general guidelines for seat cover installation. Due to the wide variety of seat styles, actual installation steps may vary.
Front and middle row installation instructions
Vehicle specific installation instructions
Rear row / back seat installation instructions
Anatomy of a Car Seat
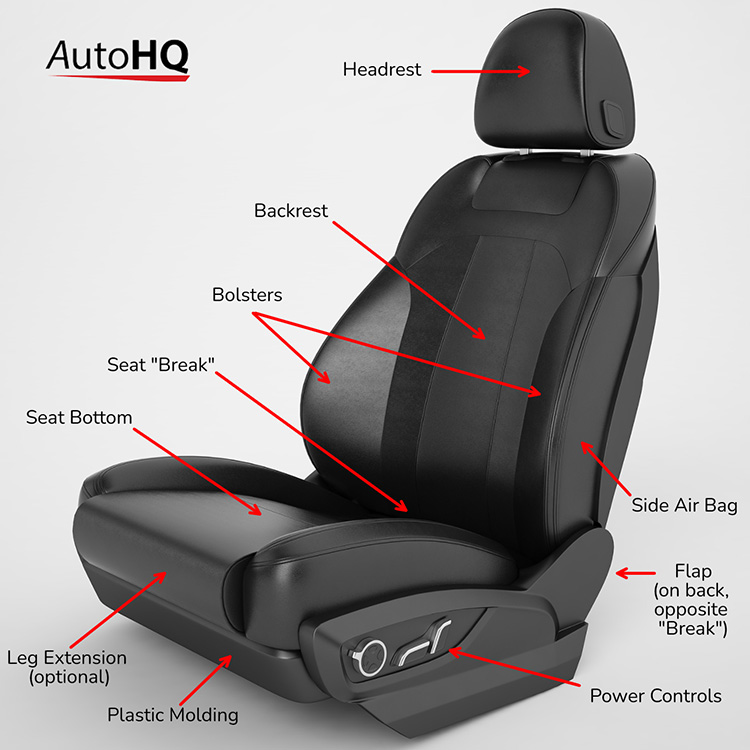
Terminology as used in our installation instructions
Illustrated in photo
- Headrest – The upper section of a low back seat that adjusts up and down.
- Backrest – The middle section of the seat that supports the back.
- Bolsters – The sides of the Backrest that "hug" you when sitting in the seat.
- Seat Bottom – The cushion part of the seat that you sit on.
- Seat "Break" – The gap where the Backrest and the Seat Bottom come together.
- Leg Extensions – The adjustable portion of the seat bottom that moves in and out behind the knees. Not present on all vehicles; commonly offered as option with sports seats.
- Plastic Molding – The part of the seat bottom beneath the seat cushion of the seat bottom. Straps must be pushed in the gap between the cushion and the molding. Tuck covers in between seat bottom and plastic molding to allow for power control access.
- Side Air Bag – The side panel of the seat backrest that faces the outer pillar of the vehicle is where the air bag is housed.
- Flap – Not present on all vehicles. Directly opposite the Seat "Break", flaps must be opened in order to install covers, then they can be returned to their normal position.
- Power Controls – The controls that move the seat direction, commonly located on the Plastic Molding on the bottom section of the seat, on the same side as the door.
Not shown in photo
- Armrests – Attached directly to the side of the backrest. Most seats do not have armrests, and those that do generally have one per seat on the side opposite the door. Not to be confused with a console, which is completely independent of the seat, located between the 2 front seats and is used as storage.
- Seat Belt – The fabric strap designed to keep passengers in place in a vehicle's seat in the event of a sudden stop.
- Seat Belt Buckle – The latch that the seat belt is connected to when a passenger is in a seat, located on the side of the seat opposite the door.
- Seat Belt Guide – Most common on 2 door vehicles, located on the top corner of the backrest on the side next to the door. The seat belt guide directs the seat belt from the pillar to the seat belt buckle. When accessing the back seat by reclining the backrest, the seat belt will stretch.
- Backrest Reclining Lever – Commonly located on either the side of the backrest facing the door, top corner of seat or in Power Controls; allows movement of the backrest for access to back seat.
- Integrated Seat Belt – Seats with the entire seat belt mechanism built into the seat, with the seat belt coming out of the backrest.
Having trouble installing?
Solutions to common issues are listed below, also check our resolving common issues videos. If still unable to install, before you take the seat covers off snap photos with your phone and text to us at 619-752-4584 so we can see the issue and diagnose a solution. Refer to the Anatomy of a Car Seat section for definitions of the parts of a seat.
Front and middle row common installation issues
General installation issues - front and middle row seats
- Not fitting properly – Can be caused by driver side seat cover having been installed on passenger side or vice versa. For correct placement, look inside the backrest portion of the cover and along one side there will be either velcro, break-away straps or openings/slots. The side with this feature should be installed facing outward, away from the other seat and toward the vehicle’s door. This allows for free operation of seat side airbags in the event of deployment, see this video that shows the importance of installing covers on correct seat.
- Nowhere to connect straps – Your seat covers have straps that are designed to hook/connect to the underside of your vehicle’s seat bottom. If they are on the top, then the cover is upside down.
Backrest portion installation issues - front and middle row seats
- Headrest holes not lining up – Once cover is on, you may need to slide the cover around by tugging on the sides of the backrest portion in order to line up headrest post opening with the post holes.
- No holes for headrest posts – Some covers do not come with premade holes for headrest posts. After installing cover to your satisfaction, locate the position of headrest holes in the seat and use a sharp instrument to cut a small cross (for sheepskin covers cut a small slit), tuck material under plastic molding, then replace headrest. Will not void warranty; however, seat covers altered by customer become non-returnable so be careful when making cuts. See this video for instructions on making headrest post openings.
- No slots / cutouts for lever on side of backrest - Some covers do not come with premade slots for the backrest release lever. Once installed to your satisfaction, you will have to make a small slit with a razor to accommodate the lever, and then tuck underneath the plastic molding. Will not void warranty; however, seat covers altered by customer become non-returnable so be careful when making cuts. The process is similar to making headrest post openings, see that video to learn how to make a backrest lever opening.
- No slots / cutouts for seat belt guide on top corner of backrest - Some covers do not come with premade slots for the guide located on the top corner of the backrest near the headrest that directs the seat belt from the pillar of the vehicle to the seat belt buckle. Once installed to your satisfaction, you will have to make a small slit with a razor to accommodate the guide, and then tuck underneath the plastic molding. Will not void warranty; however, seat covers altered by customer become non-returnable so be careful when making cuts. The process is similar to making headrest post openings, see that video to learn how to make a seat belt guide opening.
- Armrest does not fit through opening - Openings for armrests that attach directly to the side of the seat backrest can be confused with the openings for the side airbags. It is likely that the driver side seat cover is installed on passenger side or vice versa. For correct placement, look inside the backrest portion of the cover and along one side there will be either velcro, break-away straps or openings/slots. The side with this feature should be installed facing outward, away from the other seat and toward the vehicle’s door. The opening on the opposite side is for the armrest. Correct installation allows for free operation of seat side airbags in the event of deployment, see this video that shows the importance of installing covers on correct seat.
- No slots / cutouts for armrest - Some covers do not come with premade slots for armrests that attach directly to the side of the seat backrest. You will need to detach the armrest (can involve popping a plastic cap off and unscrewing a bolt or unscrewing the entire armrest itself), install the cover to your satisfaction, make a small cross cut with a razor to accommodate the armrest bolt, then reattach the armrest. Will not void warranty; however, seat covers altered by customer become non-returnable so be careful when making cuts. The process is similar to making headrest post openings, see that video to learn how to make an armrest opening. See this video for instructions how to remove an armrest from a seat.
Seat Bottom portion installation issues - front and middle row seats
- Straps on front of seat bottom too short / straps keep loosening / slippage – The straps of the seat cover must enter the gap between the seat bottom cushion and the plastic molding for a proper fit, with any excess seat cover material tucked in. Install straps above any rails or electric seat motors, that is, as close as possible to the underside of the seat bottom without looping over any of these parts. Hook to the springs on the underside or clip the corresponding straps together if not equipped with hooks. Tension the straps as tight as possible by pulling them to pick up excess slack. Straps that are installed under an electric motor will eventually loosen with the readjusting of the seat position. Will not harm any seat electronics. See this video for instructions on inserting straps between seat bottom and plastic molding.
- No opening to pass straps through to seat bottom - Many vehicles have flaps that cover the "break" in the seat (where the back rest and seat bottom come together) that have to be opened to allow the seat cover straps access to the underside of the seat bottom. To do this, look for clips or hooks on the underside of the seat that hold the flaps in place then unhook them so that the flap opens. Install the seat cover, pushing the straps through the "break" of the seat and secure the seat cover's hooks to the underside of the seat. Finally, replace the clips that hold the flaps in place on the underside of the seat. See this video for instructions on opening the back flap.
- Controls on side of seat bottom are not accessible - Tuck the seat cover in between the seat cushion and plastic molding. See this video for instructions on tucking in seat covers into a seat's plastic molding using a tool.
- Leg extensions of sport seats do not extend - Semi-custom and universal fit covers do not allow for leg extension movement, only custom made covers. Contact us for options.
Rear row / back seat common installation issues
General installation issues - rear row / back seat
- Not fitting properly – Can be caused by the backrest portion having been installed on the seat bottom or vice versa. Lay both pieces out side by side and the longer one with the additional curvature in the upper 2 corners corresponds to the backrest. The shorter of the 2 pieces with less curvature on the corners corresponds to the seat bottom.
Backrest portion installation issues - rear row / back seat
- Cover too wide / long – Any extra material should be tucked behind the backrest, like folding a sheet under a mattress when making a bed. See this video for instructions on installing the backrest portion of the back seat cover.
- No holes for headrest posts – Back seat covers do not come with premade holes for headrest posts. After installing cover to your satisfaction, locate the position of headrest holes in the seat and use a sharp instrument to cut a small cross (for sheepskin covers cut a small slit), tuck material under plastic molding, then replace headrest. Will not void warranty; however, seat covers altered by customer become non-returnable so be careful when making cuts. See this video for instructions on making headrest post openings.
- Center armrest in backrest does not fold down - Semi-custom and universal fit covers do not allow for center armrest movement, only custom made covers. Contact us for options.
- Backrest sections do not lay down separately - Semi-custom and universal fit covers allow for entire backrest to fold down or up at the same time, not each section on it's own. Only custom made covers allow for split bench backrest sections to lay down separately. Contact us for options.
Seat Bottom portion installation issues - rear row / back seat
- Cover too wide / long – Any extra material should be tucked underneath the seat bottom, like folding a sheet under a mattress when making a bed. See this video for instructions on installing the seat bottom portion of the back seat cover.
- No holes for seat belt buckles – Back seat covers do not come with premade holes for seat belt buckles. After installing cover to your satisfaction, locate the position of seat belt buckle in the seat and use a sharp instrument to cut a small cross (for sheepskin covers cut a small slit) and tuck material under plastic molding. Will not void warranty; however, seat covers altered by customer become non-returnable so be careful when making cuts. See this video for instructions on making opening for seat belt buckles.
- Cannot remove seat bottom – Varies by vehicle, many seat bottoms just pull up while others require tools. We recommend searching YouTube for a tutorial specific to your vehicle.
- Slippage – Caused by loosely installed straps on the underside of the seat bottom. To resolve, pull the straps as tight as possible to pick up excess slack.
- No slots / cutouts for hinges – Some vehicles have visible hinges on the seat bottom that connect to the backrest. Back seat covers do not come with premade holes for these hinges. After installing cover to your satisfaction, locate the position of the hinges in the seat and use a sharp instrument to cut a small slit and tuck underneath the seat bottom. Will not void warranty; however, seat covers altered by customer become non-returnable so be careful when making cuts. The process is similar to making seat belt buckle openings, see that video for instructions on making opening for seat bottom hinges.
Still need help?
For professional help installing, we recommend searching for an upholstery shop near you or contacting your local auto dealer's parts department. We also provide installation service in Escondido, CA and Corona, CA contact us for more information.